Thursday, 10 May 2012

Post + Filming

So it turns out that Post was available for filming! Yesterday we contacted the band and they agreed to filming a music video today which has been a huge relief to us; we'd be meeting up and filming in a spare room in the music block.We spent the rest of yesterday planning what we could do and concluded that we're going to have to settle for just a performance due to time constraints.

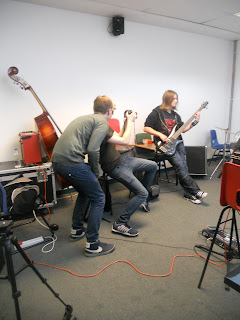
We brought the equipment which included a laptop (for offloading data onto), my camera (plus an SD card), tripod and dolly. We planned to start filming at 10:30 in the music block at the college, but one of the band members didn't show up until after 11, so we took some time to get some shots of the room. To make the time more productive, we asked the present band members to set up their equipment and start playing the song, we could film each band member individually to give us more footage for the video.

Our setting was particularly bland, but that was a consequence of running out of time to find a band and organize early on. Beyond filming the entire performance somewhere else (not an option at this point), we could perhaps add a narrative or a story-line to cut between during the performance (which was also unlikely given the time restraints). The band knew the song and were able to play it from start to finish, they played the song several times and as we filmed it from a variety of angles.

Whilst filming, I acted as the cameraman. I was in charge of ensuring we got a good set of shots and effective camera angles that made the scene look more interesting. I also was in charge of using the equipment such as the trip-pod and dolly which I combined to get some interesting moving shots. I was chosen for this role mainly because I was most familiar with the camera we used which requires a lot of manual setting changes in order for the video to look good. I changed the video quality to be 720p which is high definition (1280x720), this makes the video lower quality than full HD 1080p (1920x1080) but of smaller file size and of higher frame-rate.
 File size for the video was an important variable to consider as it allows us to fill up our small SD card (which is roughly 8Gb) with more video than if we used full HD, which translates to less time spent offloading the video onto the laptop (to allow for more space on the SD card to film) and less time editing later on (larger video files with higher definitions take longer to load and edit on the computer). Halfway through our session the camera's memory filled up and we had to offload all the video data onto the laptop we had at hand; this was frustrating because the laptop was slow and this took 10 minutes or so which was precious time we could have spent filming before we had to leave. This could have been solved by using a larger SD card such as 16GB or 32GB instead of 8GB. Battery power wasn't a concern as I had fully charged it before the shoot, but ideally I should have brought extra batteries in-case we ran out of power.


We got the band to play the song 6~ times, with three of those spent filming the band directly from the front, from the right side and from the left side. With the other takes I moved around the room to film band members from different angles and more obsqure positions such as from the floor looking up. I'm satisfied with the shots, but I can't help but feel we were cut-off by the 12:00pm deadline we had to clear out the room; I think there was more we could have filmed and from more angles and positions. Having more footage would have made the edit more interesting which is something we need to compensate for the lake of narrative or variety of the performance.


Doug was in charge of directing the shoot. He got the band to preform when we wanted to and re-arranged them around the room to get the ideal set-up. For example, he arranged the band members to walk into the room and allowed for me to film them doing so, giving us a shot to use for the introduction of the music video. Holly was with us as well, taking photos of us working and of the band preforming to use as evidence for the write-up and for the paperwork we've been creating detailing our process. She was also assisting us by ensuring all of the equipment was ready to be used and went to Steve's classroom to pickup the laptop and dolly. Unfortunately Dan was not available as he was ill.

Once we were done with the shooting, we offloaded all of the footage onto the laptop to ensure we had a copy of all the footage. Seeing as Post's schedule is more flexible than Forest's, we should be able to get in contact and film something more in-case we don't have enough footage to edit with. Strangely though, Post don't have a recorded version of the music they had been preforming (something you could listen to on a computer). We've asked them to record a version for us, as our task for the music video is to lip-sync the footage with a soundtrack, which obviously isn't possible if there's nothing to use. Hopefully we'll get the recorded version soon enough so we can start editing.


Wednesday, 9 May 2012

A-band-oned!

We now longer have a band to use! After much discussion with the band Forest, it's become clear that the band as a whole will not be available for filming over the next few weeks. We can get individual members to be available on certain days but unfortunately we need the whole band to be able to shoot this music video; a combination of exams, busy schedules and the run-up to the end of college have been to blame. We our only option now is to look for other bands who will be available to film. We only have a week and a few days to organize, film and edit a music video!

We've been looking for different bands that could fill the role. Holly began by looking at the "top 5 chart in Cambridge" through her work at a local radio station; this was a good place to look for aspiring bands who would be willing to preform in a music video. I wasn't there for it, but Holly found and contacted the local band 'Varsity' who were actually available to film on that night. Unfortunately, neither me more Dan were at college at the time and the other team members didn't have the necessary equipment to film them, therefore we let them go. We're running out of time and we're unlikely to be able to do anything special with this music video which is very disappointing and a bit disheartening for our group. 

As a last-ditch effort we went to the Long Road music department to ask if they had any idea if there were any bands there that would be willing to be part of a music video. They told us that the band 'Post' might be able to preform for us and that we should get in contact with them. Hopefully having a band literally next-door to us should prove to be easier.

Equipment Hire

We are permitted to use the college's equipment, but for the sake of creating this video we decided we would look what professional equipment we could possibly hire for use during filming in addition to what we already had to use.

First and foremost, we needed somewhere accessible we could hire equipment from that was at least somewhere close. With a bit of research we concluded that there was nowhere in Cambridge that was offering professional grade filming equipment, therefore we needed to look outside the box. We eventually found a location near Stansted Airport that offered a huge range of top-tier grade equipment. We then proceeded to look up the various pieces of equipment we needed.

vmi.tv

Camera
We had been using DSLR cameras in our other photography work inside college and we've become quite used to using them; whilst we've been using them for taking photos, they offer the ability to film high definition video. We've been looking at the results on video sites such as YouTube and we're thoroughly impressed at the quality of video produced. Based on those factors, we wanted to use a DSLR instead of a traditional video camera to record our footage. We picked the Canon 5D Mark II as it was a good trade-off between great quality and cost.
Daily rate:  £80


Tri-pod
A tripod is a stand a camera can be mounted on, extended and moved around to get a stable shot. We wanted some of our shots to be still and stable, therefore a tri-pod is pretty much essential for us.
Daily rate: £15


SD Card
Filming HD footage requires a lot of digital memory as multiple video files are large in size. We wanted a large sized SD card (the type of storage a DSLR uses) so we wouldn't have to worry about running out space to record footage. Once we complete filming, we can simply plug the SD card directly into the computer and import the footage; it's easier than using a camera which has storage built into it.
Daily rate: £18


Dolly
Dolly's are movable platforms can be attached to tripods or to cameras. Moving a dolly that has an attached camera translates to smooth movements in the recorded footage. We wanted to experiment with this video a little so we thought it would be a good idea to try using one of these. Dollys come in all shapes in sizes, but we wanted to keep it simple and chose on that could be attached to the bottom of a tripod.
Daily rate: £15


Computer
This will be essential for off-loading and editing the resulting footage that we record whilst filming. We already have free access to school computers and our own personal computers at home that are already loaded with the required software we need to edit the film. But for the sake of this evaluation we will factor in the costs of hiring a computer (a MacBook Pro with Final Cut pre-installed in this case).
 Daily Rate: £100


All of the prices added up comes to about £228 per day which is far beyond what we'd be willing to spend to shoot this music video. We're unsure of all of the dates we will need to be filming on as we may need additional days to film more, therefore our expenses would skyrocket for every additional day we filmed. We decided we wanted to negate these costs by looking for equipment we could readily acquire for free which meant asking our team members and / or college. In the end, we were able to get the dolly, tripod and computer from the school whilst we planned to use my own camera (Canon 550D) and memory card. By doing this, we effectively negated the costs down to nothing. If we were in need of equipment under certain circumstances (such as my camera breaking) we'd be ready to hire out equipment from vmi.tv and pick them up from Stansted.

Thursday, 3 May 2012

Narrative Ideas + Film Planning

We took Forest's ideas they wanted for the video and plotted them down on a spider diagram in addition to our own ideas. We had traditional ideas such as walking around cambridge while singing the song, but overall we were most interested in thre idea of filming with an audience of toys as it was an interesting and adds a good degree of humor (which engages the audience well). We decided that we really liked the idea and wanted to focus on that. But before we start arranging for the collection and purchasing of these toy props, we would need to decide on when we were filming. Ideally we would have liked to film it this following weekend (5th and 6th) but unfortunately I'm away for the entirity of it. I wanted to be there for filming so we suggested that we film next thrusday. There was a problem with this as their lead band member (Henry) would only be able to film this saturday while only two other band members (Jack and Peter) would only be available to film on thursday for a couple of hours. We were running out time so I told the band that we would be willing to do something with only two band members available.

With only two members available, we'll be unable to do something sophiscated such as the toy idea because it'll require a lot of effort from numerous people, not to mention it wouldn't work as well with only two members. We'll have to do something more traditional; I was thinking of going to a nice scenic area such as a lake and having them rest thier backs agaisnt a tree while singing. We could then do cut-away shots in our time to another narrative to make the video more interesting. We'll keep in contact with the band to see if anything changes.

Wednesday, 2 May 2012

Forest's Song - The Great Greens

We contacted the band and found the song they'd ideally preform was 'The Great Greens'. This is one of their feautured songs and the one they feel would be the most benefiticial track to be acomplianed by a music video.
We looked up the track on SoundCloud.com which a social network for music artists who can freely upload their tracks and projects for others to comment and listen to. After we were told they wanted to do this track we went to their SoundCloud profile and listened to the song. This allowed us to gather a general 'feel' for the track to allow us to start coming up with concepts for both the narriative and the preformance.


Using a revived technqiue we used for another music video, we began to map out what happens at particular points of the song. We listened to the and recorded notable events, transitions or changes at the relevant points on the timeline. Vocals such as 'ooohs' and transitions between different parts of the song were important to note down because they would make for good points to include cut-away shots in the edit. Being able to map these out to specific times would help us in the edit to determine how long different sections of the vidoe should be and give us opportunities to cut to parts of the narrative.


We took to Facebook and invited all the members of the band and all the members of our groups into a group discussion we could all contribute to. We asked them straight away about what kind of narrative and ideas they would like for the video and they were quick to provide a potential storyline. Dominic (of the band Forest) brought up his idea; the band could be prefroming in a threatre setting and cut-away shots could reveal that the audience are infact toys rather than people. This would allow for a lot of funny cuts and seqeunces such as Dom's suggestion as a cut-away shot to a particular toy looking into the camera followed by a closeup of a band member winking back. In the later half of the video the band would be shown destryoing the toys, ripping them up, smashing their guitars into doll play-houses. The song could end with toys falling from the cieling and 'attacking' the band members.

Friday, 20 April 2012

Planning - Forest

Stephen's band was unfortunately being used by his own music video group, so we had to rule them out while deciding on what band to use. Another option opened up for us as I remembered I had a group of friends who went to Hills Road Sixth Form College who have their own band. The band is called 'Forest' and is an indie band that preforms in Cambridge at local venues. They're a five member band consisting of several guitar players including a vocalist and a drummer.
536796_310958518977934_109411952465926_745976_145313252_n.jpg

The music video would be of mutual benefit as Forest currently don't have one and we would be able to create one and document it for the project. I'm friends with the group so in theory it will be easy to contact and arange the filming with them.

Thursday, 19 April 2012

New Music Video

Today we have been given a new task: create a new music video. The video has to be made in co-operation with a local band who preform in Cambridge; it's up to us to organize all the aspects from planning, production to post-production. We've arranged ourselves into groups to work on the project; I'm working with Dan, Doug and Holly.

First of all we would need to decide what band we're going to be filming, then we would follow that up by deciding on the details of filming such as location, time and equipment needed. We created a mind map to see what bands we could ask to film. One of our classmates is in a band himself, which means we immediately have an option.


We came up with this shortlist for bands we could get ahold of:

  • Prince Among Thieves
  • Alice Wilkinson 
  • Lewis Mokler
  • Total Emergyency

We then started to narrow down our choices from these four. Prince Among Thieves is a large band, therefore they would be harder to organise and get together for the production so we ruled them out. Stephen's band (Total Emergency), and the solo artists (Lewis Molker and Alice Wilkinson) would make for easier choices. We will then decide between these three then start contacting them in order of prefrence to see if they're available.

Tuesday, 10 January 2012

Practitioner: Ben Blair

Ben Blair, An aspiring character animator came into class recently to talk of how he got into the field of professional animation and how he's working his way up the ranks in the industry. Currently, Ben is working under the guidance of mentors at DreamWorks with some of the world's most skilled animators.

Ben Blair

He talked about how he became interested in animation after completing a media course (similar to ours) whilst at sixth form. He went on to experiment and teach himself how to use animation software and packages such as Adobe's creative suite and blender, ultimately applying for the 'Maya Fast Track' course at the Gnomon School of Visual Effects. Maya is considered to be the industry standard 3D animation software; it is difficult to learn but extremely rewarding to master. Ben explained to us that if we are looking to become experts in animation we should learn as early as possible how to use the tools and software the industry has come to adopt.

 He emphasized learning whilst in and beyond college will give us an advantage over others looking to get jobs in the same profession as employers will choose candidates they won't have to train as much to use their software. On that note, Ben told us an interesting fact that many studios will buy software (such as Maya) and have their own programmers edit and change it in ways that will be suitable for them. For example, some studios may have customized software that allows them to create water simulations for easily than the base software. Despite this, knowing how to use the base software will make it easy to adapt to the customization and again, making you a better choice for employers.

Ben introduced us to various websites that offered online courses and tutorials for us to use if we were interested in learning the various packages that the industry used.

iAnimate.net

This site offers numerous online workshops and tutorials to help aspiring animators get their character animations up to studio-level quality. Participants use top-tier grade software and engage with professionals currently working in the industry to review their work and improve their skills; they engage in 1-to-1 online video chats in which the mentor can see and comment on their work in real time. Ben recommended this choice as it was a great way to get experience from those working in top animation studios and learn how to polish their animation to levels that would meet employment standards in the animation industry.
The Gnomon Workshop

This is another site that users can kind tutorials and online workshops by those already in the industry. Ben personally used this site for their 'Maya fast track' to quickly learn how to get to gripes with the program. They offer many specialized workshops and tutorial courses in different areas of animation and model design. The site uses a subscription based model that varies depending on what courses and tutorials the user is interested in learning.


Animation Mentor

Instead of individual workshops and tutorials, animation mentor focuses around a more 'traditional' model of having courses students can apply to for certain amounts of time and for terms for example, a course could take over 10 months whilst another could take 3. The courses vary from the 'complete' package that teachers students everything they need to know to work as a professional animator from beginner or more specialized courses such as animal animation.


Ben also showed us a variety of other websites such as more common video tutorial websites such as Video Co-pilot which is focused around visual effects and other sites that offer tutorials for all major design programs.


Ben also gave us advice on creating demo reels for use when applying for university or for a job in the industry. He told us we should treat it like a story, progressing in a way that shows off your 'creative flair' and has maximum impact for the viewer, only showing off your best work. To maintain the rhythm for the demo reel, Ben recommended we put some serious thought into what kind of music we overlay the presentation with; music sets the tone for anything its associated with therefore what we chose should reflect what we're trying to portray. Using music that is too 'mainstream' will reflect badly, unless it is somehow directly related to the content of the demo reel, using beats are lesser-heard music will go further in helping to sell your demo reel.

Beyond animation and software, Ben also told us a bit what it's like following his dream and being outside college; working for real clients and making money has changed him and his behaviors and no longer finds himself procrastinating from his work. The message he wanted us to understand was start working your way into creative professions - such as an animator - as soon as you can, whether that's building a web of useful contacts or learning the tools of the trade. Overall, I found Ben's talk very insightful and helpful for deciding on how to get into the studios that power the creative industry.

Wednesday, 4 January 2012

Final BLU style animation

I have completed my BLU style animation using Adobe After Effects. I attempted to try and re-create some of the elements from the BLU graffiti video. Below is the animation combined with a simple audio track:


I started off by taking my distorted ghost animation (see previous post) and implementing it over a photograph. I went out with a digital camera and took many photos of a particular spot in the college; my original plan was to have the ghost flying around the side of a wall and off into the distance. The animation was disorientating as the ghost moved past various photos (like a scrolling game) that looked alike . I tried to fix the animation by stiching the photos together like a panorama which had poor results - I stuck to using only one photograph.

Example of a panorama photograph

Photograph I used for the final animation

Using the same principles as animating parts of the character in Adobe After Effects (see this post), I animated the position of the ghost animation to move about the screen. I grouped the animation into its own composition so it could be animated as a single object rather than a collection of body parts (also explained in aforementioned post) so I could animate the position property (move it around over time). I created the movement animation for the ghost and applied motion blur and eased the motion to make it smoother. For some parts of the video the ghost also moves through 3D space; I did this by enabling the ghost animation to be a 3D object giving it the ability to move and rotate along the Z axis as well as the X and Y axis's. The usual animation principles still apply even in 3D space.

There are paint splatters on the wall where the ghost appears. I achieved this effect by taking paint splatters from my licensed stock footage pack (Riot Gear - shown below) and placing them over the wall and resizing them. I set them all to be 0% opaque and animated them in a sequence to appear once the ghost moved over them; I wanted to try and re-create the paint effect that BLU used in his video when a character moved along a wall.


The video shakes as a whole which implies it was filmed as a video without a tri-pod or support. I did this by creating a null object (an object with no information) and applied a random movement expression (called a wiggle) to it. I parented all of the other elements of the video (the photograph, ghost and paint) which allowed them to move along with null object - this creates the illusion the video is shaking as a whole as if it was being filmed when in reality it is a still image. To make the pseudo-video effect I added a subtle brightness colour correction that randomised to make it appear as if there was a camera that was receiving different levels of light as it moved around.

Overall I am pretty satisfied with the animation. I think if I had more time there would be more I could do to it to make it more convincing. I think with the camera shake I could have made it very jerky in the same fashion as the ghost animation to make it seem as if it was a series of photographs rather than a video that was being taken. If I wanted to get very serious with this I could animate the paint so it appeared around the outlines of the ghost at a given time; this would be a convincing effect but would take up a lot of time.


Monday, 28 November 2011

Using After Effects To Distort My Character Animation

Recently Steve showed the class how to scan in and 'clean up' our scanned drawings for our Character Animation we did a few weeks ago; these would in turn become the frames of the animation we would go on to use to project against walls in a later task. This cleaning up process would be done in photoshop to made the pen lines thicker and to get rid of the background from the paper. I went into a panic when steve was showing us how to do this because I could not apply these techniques; I was too far ahead compared to what people in my class had done and had actually put myself at a disadvantage.


The ultimate goal of this character exercise was to take the animation and use After Effects to 'project' it against photographs of walls around the college in a similar fashion to the animation 'Muto' by Blu. I went back to my ghost animation and analysed it, I concluded that it looks far too smooth and vector like to be used for such an application. I had a predicament: should I re-use the scans I originally did or capitalise on the work I've already done digitally? I have a philosophy when it comes to video work, I believe any information available can be manipulated in any way to achieve any visual look desired. With this in mind I decided I would go back to my digital animation and see what I could do to make it look more natural and hand-drawn.


This is the 'Muto' Animation, a look I will try to aim towards


This is my digital animation I am using as a reference for the process below

I opened up my animation in After Effects and started by reducing the number of frames of the animation; mine currently has 50-60 frames throughout its duration which is great for giving smooth motion but poor for replicating a drawn feel. I reduced the number of frames by changing the composition frame rate from 12 to 6. Next I disabled the motion blur as stop-motion animations don't have this visual atheistic unless added in artificially. There is slight hints of colour in the animation  which I didn't want so I applied a 'fill' effect to each coloured layer to make it a solid colour.

At this point the animation has the properties of a stop-motion animation but the illustration is still smooth and un-convincing. I thought about this and decided I would use the distortion effects in the program and animate them over time to make the animation jiggle, expand and contract in a way that made it look as if it had been drawn. I was able to achieve the following effect after using and refining various distortion effects:


.
I am satisfied with how the effect turned out and I believe using this distorted animation will be more appropriate when I interoperate the animation onto a photograph.

Thursday, 24 November 2011

Love Spin

We watched a video today in class titled 'Love Spin' which was another great example of the possibilities and scale that can result from stop-motion animation.


5xlaR.pngThe animation features a slowly rotating circular platform with a central plant and pot. There is a main blue plasticine figurine that sits in-front of the pot who later stands up and walks at the same rate as the rotation keeping it in the centre of the frame for the second half of the video. As the platform rotates the set slowly evolves and transitions from empty countryside to village to city with all of the props and buildings centred around the plant pot. With each full revolution of the platform there is a noticeable difference of the sets and props; these slowly come to being from behind the plant pot where the viewer cannot see them being placed. The video finishes with the figure walking 'out' of the city (or this could be seen as the sets 'de-evolving') towards the countryside to sit down in his original position but with a female figure.

M06Fe.png
I really enjoyed watching this video as it shows some imaginative ways to spice of the tried and tested stop-motion animation technique. The technique of placing objects behind the plant for them to rotated into view is a stroke of genius; the rotation effect creates a consistent pace and evolution throughout the entire video, makes it easy for the animator to add or remove objects in 3D space all whilst creating an interesting video. All of this keeps the viewer engaged which can be difficult with stop-motion animations.

I've enjoyed watching the animation but I feel as if it is too long. The strongest point was the evolution of the world around this character but this process stops about half way and stays flat whilst in the 'city' scenes. The video builds up to the city environment however nothing really happens once the character starts walking; I feel as if something more could have happened other than the traffic becoming busier, it seems like filler to sync up to the song. Whilst the animation in this scene is admirable it drags on for too long unlike the buildup from the countryside to the village and then onto the city which has a lot of change. At the end of the video the camera zooms out of the platform to reveal it is sitting on-top of a vinyl; whilst impressive at first to consider the animation was done at this scale but can be analysed as a visual effects editing technique to transition from a larger model to a smaller model. I see this transition a fabrication; it was created smaller scale to make the animation seem more impressive. Whilst I am not doubting this is a well made animation it seems unfair pass it up for more than for what it is worth when other animations such as 'Dot' go to great lengths to animate at a miniature scale.

It would be interesting to try and apply some of these principles (evolution, consistency, seamlessness, forced perspectives) to our own animations but with any stop-motion work it is extremely time consuming, however the end result can be impressive just as 'Love Spin' has shown.


Saturday, 19 November 2011

Bringing The Limerick To Life

We spent the next couple of sessions continuing to create and cut out assets as well as animating them together into one stop-frame animation to re-create our Limerick: 'There was a Young Lady of Niger".


We had started finishing up the main background setting and we had the idea of cutting all of the trees and foliage off the A3 paper and placing them onto another - this allows us to move characters such as the tiger and the girl behind trees as well as in front of them, we felt as if this would give our animation some depth. Having the option to be able to move characters in-between the trees would give us more options on how to animate the sequence; in the final animation we had the lion character exit the scene by moving behind the trees on the left side of the set. Doug worked on cutting these objects out using a Stanley knife other than scissors to get a more accurate cut; we didn't want to have unnecessary white paper hanging off any of the objects. Holly and Dan were making the tiger and the girl characters in the meantime; we needed two iterations of the girl because they were in different poses. In any stop-motion animation it is easier to have pre-existing templates or iterations of characters for different actions or poses than it is to modify an existing one. Modifying a cut-out is difficult because unlike other materials used for this type of animation (such as clay) card and paper are difficult to modify because they need to be cut which in turn is a destructive and linear way of editing something.

At this point I started making another set for the 'stomach' scene where the girl is eaten by the tiger, I wanted to have it similar to the film 'gulp' in which there's a red stomach surrounded by black. I wanted the stomach setting to be self explanatory like it was in Gulp but in this animation the girl would be smiling, look around and act surprised and the view would zoom out and it would be self-explanatory she was in the tiger's stomach. This gives the story some charm because it isn't force-feeding the viewer information, the viewer can fill in the gaps of what happened in their mind, especially when the narration says 'the girl was inside'; it would be pretty evident that the girl was eaten. The animators making the animation did not follow the storyboard as I had written it down; neither the smiling sequence before the 'realization' and the realization itself were not present at all in the final animation making this scene confusing. the 'realization' hinted to the viewer what had happened but now this was gone. In order to make sure we didn't confuse the audience we out-right had to make a scene of the tiger eating the girl which in my opinion really dumbed down the animation as a whole because we had to explain what was happening rather than letting the audience 'fill the gaps' with their imagination. There was no zoom outwards out of the tiger's stomach either which further simplifies the animation. However, we did manage to make the stomach scene more interesting by adding a 'flow' of stomach acid which washes away the girl; I feel as if how I envisioned these scenes playing out was more engaging and humorous.


We filmed the limerick animation in the same way we created previous animations: using iStopmotion to capture frames which would be exported into Final Cut. We added credits onto the end of the animation with cut-out letters; we had the credits slide and appear into view animating each letter individually by hand. We felt as though hand-made credits rather than computer generated ones really pushed the animation across as manually cut-out and alive rather than having a hybrid of the two. I brought the video into Final Cut and extended some of the credits (having the full name on-screen for longer) and ends of scenes (such as at the end of the stomach scene before cutting to the next scene) to make the animation easier to follow rather than giving the audience little time to process what happened. I also voice-recorded a narration to the limerick and placed that over the video; with the narration I also edited it to pause inbetween verses to ensure different verses started at the correct points in scenes.


This is the final animation; Overall I am dissatisfied. I think the cut-outs, sets are well done especially the jungle scene which features a lot of trees of foliage and the two characters have a charm to them. These cut-outs fit the limerick well and truthfully represent the limerick. I dislike the project itself however for a number of reasons. The animation is very jittery and jumpy which is very evident in the jungle scene. The tiger seems to float through the scene with no sense of weight or gravity which makes it unbelievable; the tiger seems to clip through several trees, this is down to someone trying to pass the tiger through the tree and placing it ontop before the entire body has moved through. The sequence were the girl is eaten is poor, I feel as it was tacked on. The lion itself isn't the original lion, it was a traced version from the internet; As I explained earlier the entire reason this sequence exists is because the storyboard was not followed but improvised along the way. If we had more time we could polish the animation by making it smoother with more focus; we had to use 6 frames per second as opposed to the usual 12 for stop-motion because of time-restraints, this very low rate makes the video longer as a whole as well.


Tuesday, 15 November 2011

Limerick Exercise - Cutout Animation


inspired by an ex-long-road student's cut-out stop-motion animation (as seen above) we have decided to make our own in the same spirit but with a twist. The class teamed up into groups and 10 famous limericks were laid out on a central table for us to choose and work on as a group. We reviewed the limerick and started to think about how we wanted to translate that into an stop-motion animation. This is the limerick:

"There was a young lady of Niger
Who smiled as she rode on a tiger;
They returned from the ride
With the lady inside,
And the smile on the face of the tiger."


We decided the best way to handle this task was to assign each remember of a group a different role. We mutually agreed Dan was the best artist in the group so we gave him the role of drawing the most imporant elements of the story - the tiger and the lady - whilst Doug and Holly researched jungle imagery to draw and colour in their own 'set' for the animation. I was given the role of storyboarding the animation; I sat and thought about it for several minutes and talked to other members of the group about how we wanted to portray the limerick before starting on an gridded A3 sheet.


Animating The Ghostie Character in Adobe After Effects


Now I had created the character and separated the body parts into their own layers it was time to import it into After Effects and start animating the character. In this environment the layers from the character file as treated as their own layers in the time-line, similarly to how video and sound in Final Cut can be separated onto different channels in the time-line. I dragged the appropriate files from the project files (left) onto the timeline.


The next step is to animate each element. Animation in After Effects is done by changing values of properties on the object that is to be animated, in this example I have animated one of the wings of the ghost. I can expand the layer to bring up the transformation properties in the time-line and manipulate the rotation by changing the rotation value (pictured to the left) or rotate it manually in the project preview. The number manipulated in the screen shot is the angle of rotation, a '90' value creates a 90 degree turn for example. Effects and other tools in after effects give elements more properties to manipulate but I have only used the base transformation properties for this animation. Changing the value (like in the above screenshot) will only change the property for that given moment in the timeline, to animate over time I use a common process in After Effects that animates a property over a given time.


Animating a property over time is a similar process to adjusting a property. The 'stop watch' icon beside the property needs to be pressed at the desired point in the time to tell the program that you want the animation to start at that point by creating a key-frame. The needle-head is then moved through the time-line to the desired point in time for the animation to complete; changing the property at this point will create another key-frame - this creates an animation. Scrolling between these key-frames will show the gradual change in the rotation as shown above in the demonstration. Essentially this can be applied to any object and property, this is the corner stone of animating digitally with After Effects. I can copy and paste these keyframes onto the rotation of the second wing so the movement of each wing is precise without me having to re-create the key-frames. I can build the animation up by animating properties of different elements. However before I start animating the wings (and eyes) and I need to adjust the anchor points and parent them to the ghost.


Be default, the wings will rotate around the centre of the object which in this case would be very inappropriate. I wanted the wing to rotate around the ghost's shoulder giving the illusion of there being a joint between the wing and the ghost. Each object has an anchor point (shown above), this can be moved to change the centre of rotation for the object; it is moved either manually on screen by dragging the anchor point on the object to the desired location or by changing the anchor point properties in a similar manor to other transformation properties.


Characters made up of several parts like this in After Effects can be 'parented' together, what this means is that layers can copy a layer's transformations exactly but can still animate on its own. I've used this to parent every body part to the main body of the ghost. In this example I can parent the wings to the body to ensure they move up and down when I move the main body around, but I can also animate the wings to flap without having to worry about trying to move them up and down with the other body parts. I can parent by dragging the 'pic-whip' icon (pictured above) from the wing to the wing to the body to parent it (like a rope) or select the parent layer from the drop-down menu. Once I parented everything correctly I could animate the body's position to make the ghost move around.

To animate the eyes I handled them slightly differently from other body parts. In the main composition I 'pre-composed' the two eyes together into a single composition. A composition can be seen as a group of layers and another 'nested' timeline. My entire ghost animation is held within a composition, I can nest other compositions within it. Compositions are useful for treating groups of layers as a single layer; in this example I pre-composed  the eyes so I could move that composition to animate and move both of the eyes at once in the main time-line as if they were a single layer. You can 'open up' compositions to edit their respective layers and effects. For the eyes I parented the group to the body and moved them around to make it look as if the ghost was looking at his surroundings. To add life to the character I animated a mask to move up and down over the eyes to make them blink.


This is what the all of the key-frames over the time-line look like one I had finished animating the character. One of the goals was to create a looping character; this was quite easy. I copied and pasted the starting key-frames and pasted them as the end key-frames for each individual layer, this translates to a seamless loop when played back. To finish off the animation I converted all the key-frames to 'easy-ease' key-frames, this means that the animation will act like an arc rather than a straight line to subtlety make the animations more life like. As an example, the wing would start accelerating but slow down by the end of the animation rather than moving at a constant speed. Try straightening your arm by your side and bring it up to be horizontal across your shoulder as fast you can; the motion accelerated but slowed down to stop, it wasn't a consistent speed throughout the motion. I also added motion blur to the wings to make the animation seem more alive by enabling motion blur on those layers.


This is my animated character loop running at 12 frames per second. I really like this animation as it has a lot of charm, feels alive, isn't overly complex and is easy to understand. The flapping motion of the wings actually looks like it's keeping the ghost in the air and the character has a sense of 'weight' to it which is important for any character animation. I could improve this animation further by having a shadow underneath the ghost that would expand and contract and the ghost moved downwards and upwards to give it more depth. I dislike the blinking motion as it looks unnatural and awkward, if I were to do this again I would create additional closed-eye shapes to replace the eyes when needed.

There are other ways of animating characters in After Effects (such as using the puppet tool) but dividing up the character into several layers proved to be easiest; this method is useful when there aren't too many body parts and for when I need to create joints between body part however, this method can be harder to handle when there's more layers and compositions involved. Using the puppet tool gives an animatalbe 'mesh' to solid images which is useful for giving life to still images, but is more complex and unsuitable for this task.


herre's a comparrison between the digital and paper-scanned versions of the animation; it is easy to tell I tried to keep the new animation true to the original vision.

Monday, 14 November 2011

Digitizing The Character Using Adobe Illustrator

To create a digitally illustrated version of the ghost character I started by importing a single frame of the scanned animation into Adobe Illustrator. It was pretty straight forward to re-create the character, I used my newfound illustrator skills from another class and I used the scanned image as a reference to build the character up piece by piece; I put each piece onto it's own layer to make it easier to import into further programs to animate.

To make the body parts I used the pen and shape tools in Illustrator. The main body was created with a circle with the bottom removed, the rest of the ghost body was made using the pen tool. The eyes were made using the circle tool with a coloured stroke. The wings were made using the pen tool and tracing over the wings I drew and refining it until I saw fit.

The character did not change that much in translation. I made the outlines much bolder it give a more distinctive look, I filled in the eyes (which I actually forgot to do in the original sketch) and added an outline to them, I also made the wings sharper and gave them a hint of shading. Below is the completed character with all of the body parts correctly composed together.


I really think my character transitioned well once I had illustrated it. The ghost has a very bold look and feel which makes a distinctive character, combined with the simple shape makes it look a like a character I could expect to see as a street art character. I personally think the character looks good as it is and adding anything more would be detracting from the charming simplicity.


Character Re-Design and Rough Animation

I scrapped my idea for the pumpkin. I found illustrating the pumpkin design very difficult and I didn't understand how to illustrate objects like wings and feathers as well as the pumpkin itself; using a simpler design would make it easier in the long run to illustrate and animate.


I liked the use of wings from the previous design so I decided to incorporate something similar into this character, I used sharper and more menacing looking wings. The main contrast in this image is that a ghost has wings, a figure that is normally seen to float freely through the air on its own. I felt as if this would lead to an interesting animation with charm.


I also drew 30 frames of this animation on paper and scanned them all onto the computer. Drawing these frames was difficult because it was hard to judge sometimes to what degree an element should move (such as the wings flapping or the eyes moving around). I've uploaded these scanned images and uploaded them to my DropBox (online file storage). They can be downloaded in a packaged Zip file by clicking on the DropBox logo on the left of the page (135 Mb download).


This is the rough animation of my character. I took all of the images and placed them in a chronological image sequence using Adobe Premier Pro (this can also be done with Final Cut) to create the illusion of motion when played back at 12 frames per second. I don't think this particular animation is as fluid as it could be but I think that's down to the low frame rate, I also attempted to make quite subtle movements which didn't translate very well.

I tried to animate the following properties of the character:
  • Have the wings flap in unison.
  • Have the character as a whole float up and down as if it is using its wings to hover
  • Have the character slightly rotate to imply it doesn't hover completely still
  • Have the eyes blink and move around

This version does not have to be final, everything is subject to change in the digitally animated version but I would like to keep the overall ideas I listed above the same.

Sumo Science


Sumo Science is formed by Will Studd and Ed Patterson, they specialise in advertising for companies using stop-motion, 2D, live action and puppetry animation; The two are represented by Aardman Animation. The group is hired by other companies to create adverts, their most successful of which were comissioned by Nokia. Funded by the mobile phone giant they went on to create two record breaking stop-motion animations, 'Gulp' and 'Dot'.


Dot (shown above) is their most successful animation; Dot holds the Guinness world record for the smallest stop-motion animation ever created and holds countless awards in animation. Funded by Nokia the tiny world of the little girl is recorded using a Nokia N8 combined with a cell scope the video was filmed on a programmable moving table that can move millimetres at a time. Because the girl character was so tiny it had to be printed from a 3D printer that uses resin to print objects; to move the girl around the world without breaking her with their fingers they used a wire which was removed digitally in post-production. Ontop of that they hand-painted each printed model of the girl and arranged them into trays so they were not lost.


In direct contrast 'Gulp' is the world's largest stop-motion animation; the film is again directed by Sumo Science and again funded by Nokia and filmed with Nokia N8s. As opposed to Dot and the small team involved, Gulp required a whole team of animation graduates, assistants, artists and even a single person in charge of the cameras all located in the south of Wales. The cameras themselves were hoisted on a crane above the beach. The team would use rakes to create the shapes of the oceans, fish and birds whilst artists brought in costumes for the fisherman (who was actually a live person who acted like a human puppet) props and even a costume made mine for the fishes belly. Each scene would be raked and then erased for the next shot only for the scene to be re-composed again. In total this took 5 days including during the night for the interior scenes in the fish's belly (that required lights mounted to cranes to control the light); 16 hours of work equated to roughly 20 seconds of screen-time.

Lemon Jelly's Music Video "The Shouty Track"

I have discovered a music video to the Lemon Jelly song: "The Shouty Track" which features an animation similar to that of which I will be planning to make using paper and animated 'street-style' characters.


I quite like this animation because it demonstrates a lot of visually appealing ways to animate characters that have been focused around being simple and easy to draw. The style of the animation struck me immediately; it is made to look like a drawn 'flipbook' animation but is primarily computer generated. The illusion of this being a flip-book style animation comes from the paper background; the background has been animated slightly to look as if it has been moved in-between each frame which mimics that type of animation. The characters however have been animated digitally rather than drawn to also mimic typical flip-book animation.

The characters move a lower fps than conventional animation and at the same rate as the paper in the background, the strokes (lines) on the characters also jiggle slightly to imply they have been re-drawn for each frame. The most obvious evidence for this digital animation is the paper itself; even though it wiggles throughout the characters look as if they have been overlaid over it and look as if they are made of ink which can't be erased, rather than pencil.

The music video shows that there are many interesting ways to digitally animate characters which I will keep in mind when I animate mine.

Animated Characters - The Drawing Board

Our goal is to create an animated character; our first task was to create a mind map of all the potential characters we could use to animate and then decide on our favourite one. One of the briefs we had to follow was to design these characters in a similar fashion as to how other street artists had designed there characters and tags. My initial thoughts was to create eyes with limbs as these are memorable designs however, whilst creating my characters I had saw this is what a lot of others had though so I decided to use something else. I experimented with different designs focusing on creating characters featuring blends of contrasts.


- mind map -

In the end I decided to use my pumpkin character; I liked this design because it was an interesting character. I thought the wings were quite visually striking and the idea of contrasting something associated with Halloween and evil (the pumpkin) and more holy and positive elements (the angle wings and halo) appealed to me.

My next goal will be to illustrate this using Adobe Illustrator, eventually moving it over into Adobe After Effects to animate it. Before I can do that however I will need to draw the animation's frames similarly to how I drew every frame in the bouncing ball exercise; I will keep in mind the problems that occurred before and correct them this time whilst drawing my new animation. 

Sunday, 13 November 2011

Jan Švankmajer

Jan Švankmajer is a film maker is renowned around the globe for his surrealist stop-motion animation; born in 1934, he studied at the College of Applied Arts in Prague through the 1950s and later pursuing his passion for animation, puppetry and film at the Department of puppetry Prague Academy of Preforming Arts. His work has inspired many modern day film makers such as Tim Burton, Terry Gilliam and countless others.

Among his work some of the most notable and iconic pieces were his short films, some of which featured extensive stop-motion clay-animation involving human forms and body parts. These clay characters would join, form, detach, blend, move and interact with each other to create alive and stunning surrealist imagery; these short films could take take weeks to months to complete due to the high level of detail and careful, smooth, progressive changes made to the characters and objects in-between frames. Beyond clay he worked with a large variety of physical characters and objects.


Darkness/Light/Darkness (above) is one of Švankmajer's clay animations. Along with the fluidly animated clay body parts and iconicly exaggerated sounds lies underlying themes similarly to his other works. In this particular example there's many ways to interpret the piece as a whole; One possible meaning is that man is composed of animal instincts in a strange blend of intelligence (shown through the animal characteristics of some of the body parts and the intelligence of the hands). Another possible meaning is that man's growth has only led him to be trapped and confined; Švankmajer leaves it up to the viewer to decide on the meanings of his work.


He has also combined his animation skills and techniques with film and live characters, the most famous of which is his surrealist re-imaging of Alice in Wonderland. 'Alice' was the winner of 1989 Film Feature award at the Annecy International Animated film festival; the film was praised for its fluid animation and clever intergration of a live actor with stop-motion animation. The film is also an example of the variety of materials, props and characters he has animated. Even as a re-imagining 'Alice' stayed truthful to the original story.

Most recently Švankmajer has released the comedy feature film 'surviving life' that combines cutout animation with live action footage and actors; the film proves his talents in animation and story telling continue to excel.  His next release 'Insects' is due to be released in 2015.

Thursday, 3 November 2011

Stop Animation Sound Exercise

Today we combined our knowledge and basic skills of stop animation with our previous experience with creating sound tracks.


We created a stop animation using coins and a topple-ware box. We took the box and started brain storming in what we could do; most of the actions were improvised as we filmed as we suggested ideas throughout the process which turned out to be successful.


We had several piece of large card (to hide the table below) which we preformed all the actions on. We had a video camera on a tripod linked to a laptop beside it running iStopMotion. 


We had the box open and spill coins across a table, the coins then moved around and back into the box. The lid of the box formed a ramp for a single coins to roll up and fall into and then the lid was put back on to finish where the animation started. We were sure this time as a group to make the animation much better than our previous ball animation, we did this by making sure each change in-between frames were less dramatic and more subtle. Carefully animating this makes sure that the overall video is more visually pleasing to watch and the length of the video increases as a result which in this case is a positive side effect.


We used iStopMotion again to record this. To run through the process again we took a photo whenever we made a change and by the time we had taken a photo throughout the sequence we could play them back as a video and we create the illusion of motion.


the change we made this time was to add a soundtrack using foley sounds (which involves recording the sound something makes and placing that over video). We completed the video then used final cut to record voice overs however, we used this function to record sounds for the video. For example for the topple ware box we would start recording then close one of the sides of the lid, we repeated this process for each side and then synced them to the video in final cut. We individually recorded each sound and synced them up throughout the video and end result is great and we are satisfied with it. We did this by recording all of the sounds and matching up the start of each sound with roughly the start of each the action in the video. 


This is the end result and we are all pleased with it, both the sounds and animation work well together and creates a nice and fluid animation. We also managed to fix the previous issue with the lighting by making sure no excess shadows in the shot. There is a small blurred object in the top right at one point of the video, we are not sure what this is but we will be sure to keep all objects away from the lens next time.